Using ASP.NET Identity
When I started customizing my MiniBlog, I wanted a more robust comment section than one that relied on JavaScript to prevent bots from adding comments. Email confirmation was an option, but I chose to require a login. While it gives me more control, unfortunately it also acts as a barrier for users trying to create an account. That's why I also wanted to support also external logins so that users wouldn’t have to create yet another account.
Fortunately, there is ASP.NET Identity. I integrated it into my MiniBlog using scaffolding as a starting point. Identity provides a solid foundation for handling authentication, with built-in support for local and external logins, two-factor authentication (2FA), and more. Here are the steps I took:
Adding the NuGet packages
I'm using Entity Framework, so I'm also using the Microsoft.AspNetCore.Identity.EntityFrameworkCore package. You can use ASP.NET Identity. If you're not using EF, then you don't need the package. However, you will need to add your implementations of some Identity interfaces, such as IUserStore and IRoleStore, among others.
Create or Update DbContext
Create or Update your DbContext to use the IdentityDbContext instead of the DbContext.
public class MiniBlogDbContext : IdentityDbContext
{
    // your own internal DbSet(s)

    public MiniBlogDbContext(DbContextOptions<MiniBlogDbContext> options)
        : base(options)
    {
    }
}
Update Program/Startup.cs
- Registrate DbContext
I use the lightest basic Azure SQL Database available. I know that it can experience transient (temporary) connectivity issues. The EnableRetryOnFailure makes it reliable in case that happens. You probably only want to use it with a cloud-based database in cases like this.builder.Services.AddbContextFactory<DbContext>(options => options.UseSqlServer(configuration.GetConnectionString("MyConnectionString"), providerOptions => providerOptions.EnableRetryOnFailure())); - Register Identity
builder.Services.AddIdentity<IdentityUser, IdentityRole>(options => options.SignIn.RequireConfirmedAccount = true) .AddRoles<IdentityRole>() // Only needed when you use roles in your application .AddEntityFrameworkStores<DbContext>() .AddDefaultTokenProviders(); - Configure cookies. You can skip this step if you prefer, as I use the default values.
builder.Services.ConfigureApplicationCookie(options =>
{
    options.Cookie.HttpOnly = true; // This ensures the authentication cookie cannot be accessed via JavaScript (for security against XSS attacks)
    options.ExpireTimeSpan = TimeSpan.FromDays(14);

    options.LoginPath = "/Identity/Account/Login";     //set the login path.
    options.AccessDeniedPath = "/Identity/Account/AccessDenied";
    options.SlidingExpiration = true;
});
Scaffold items
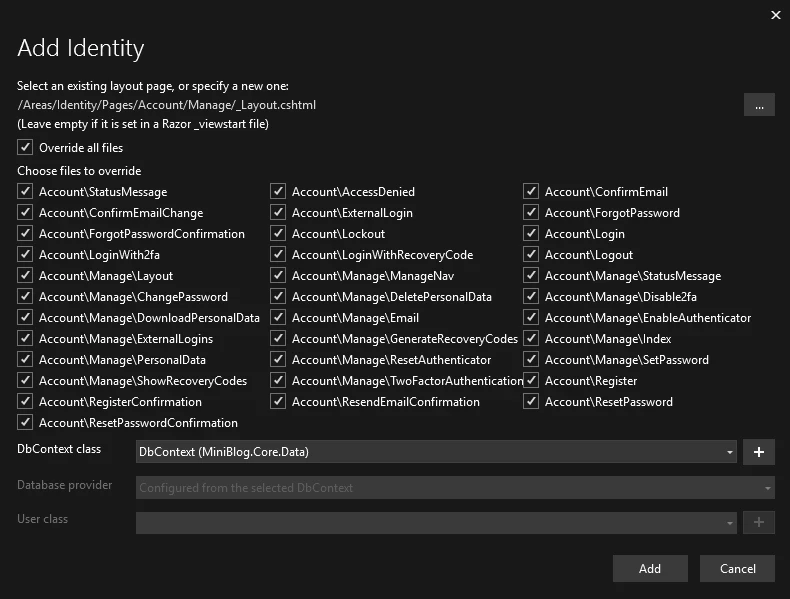
Use Add > New Scaffolded Item... to override the default ASP.NET Identity views. Even if you don’t plan to use all the features, it’s a good idea to scaffold all the available Identity pages. That way, you maintain full control over the UI and behavior. For any Identity pages you don't need, you can modify the logic to return a 404 Not Found response, effectively disabling those routes.
When you use Manage\EnableAuthenticator.cshtml, be sure to add the two extra JavaScript files necessary for displaying a QR code. When you open the view, you'll see a link to the documentation.
Add a implementation of EmailSender
Of course, a login isn't complete without a email confirmation and the ability to reset your password. When you open the Register.cshtml.cs or the ForgetPassword.cshtml.cs, you will notice that they use an IEmailSender. You only need to add an implementation. I used Microsoft's documentation for this: https://learn.microsoft.com/en-us/aspnet/core/security/authentication/accconfirm. It's a simple interface with only one SendEmailAsync method, so creating your own implementation with your preferred email service should be easy.
As the Microsoft documentation describes, after adding an EmailSender you should update RegisterConfirmation.cshtml.cs. Make sure to set the DisplayConfirmAccountLink to false, or even remove the code block and the EmailConfirmationUrl property entirely.
Comments
Register or login to leave a comment